Introduction
Mistral AI has quietly built one of the most practical coding agent ecosystems in the open-source AI space, and with the launch of remote agents in Vibe and the Mistral Medium 3.5 model, they're delivering a major infrastructure upgrade. This guide walks you through setting up and using remote coding agents that run in the cloud—freeing you from babysitting long tasks. You'll learn how to launch agents from the CLI or Le Chat, teleport local sessions to the cloud, monitor progress, and automatically open pull requests. By the end, you'll be able to offload coding work like refactoring, testing, and bug fixes to an AI that never sleeps.
What You Need
- A Mistral AI account (free or paid) with access to Vibe and Le Chat
- The Vibe CLI installed on your local machine (Linux, macOS, or Windows with WSL)
- A GitHub repository you want to work on
- Optional: accounts for integrations like Linear, Jira, Sentry, Slack, or Teams
- A stable internet connection
Step-by-Step Instructions
Step 1: Install and Authenticate the Vibe CLI
First, install the Vibe CLI on your machine. Follow the official Mistral documentation for your operating system. Once installed, run
vibe auth loginand authenticate with your Mistral AI account. This connects your terminal to Mistral's cloud infrastructure.Step 2: Configure Your Project and Workspace
Navigate to your project directory and initialize Vibe:
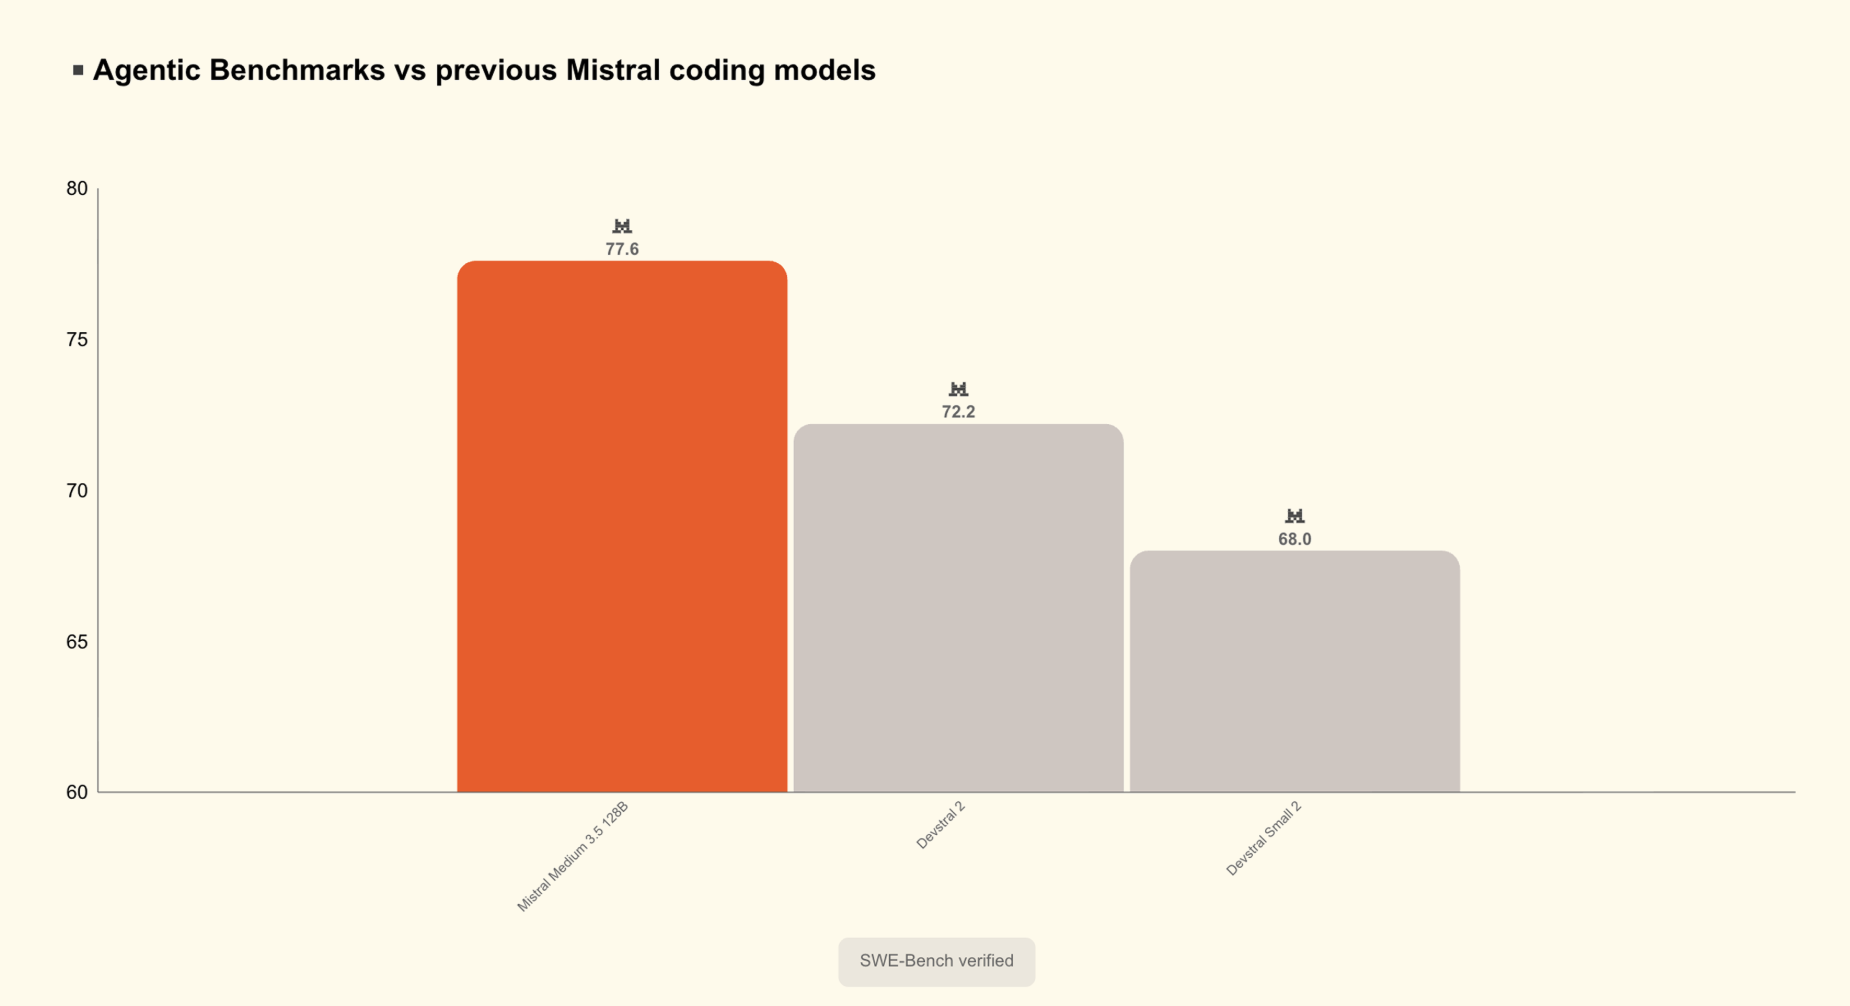
vibe init. Link your GitHub repository so the agent can read and write code. Set up environment variables for integration tokens (e.g.,GITHUB_TOKEN,SLACK_TOKEN). Usevibe config setto define defaults like the model (Mistral Medium 3.5 is recommended for best results with 77.6% SWE-Bench score).Step 3: Start a Local Session (Optional)
If you want to begin work locally, use
vibe startto launch a session in your terminal. You can give it a task directly, such as “Refactor the login module to use OAuth2 and add unit tests.” The agent will start working—editing files, generating diffs, and asking for approvals when needed. This is useful for quick, interactive tasks.Step 4: Launch a Remote Cloud Agent
To run a long task without tying up your machine, use the command
vibe remote startor start from Le Chat (the consumer assistant). From the CLI, specify the task via prompt or a linked issue. For example:vibe remote start --task "Fix the CI pipeline failures from yesterday". The agent begins executing in an isolated sandbox in the cloud. You can run multiple remote agents in parallel—great for tackling several bugs at once.Step 5: Teleport a Local Session to the Cloud
If you started a local session but realize it'll take hours, you can teleport it to the cloud without losing progress. Use
vibe remote teleportwhile the local session is active. The entire session history, task state, and any pending approvals are migrated. Your laptop is free, and the agent continues in the cloud.Step 6: Monitor Progress and Give Feedback
While the remote agent runs, you can inspect its actions anytime via the CLI or Le Chat dashboard. View file diffs, tool calls, progress states, and questions. The agent surfaces these in real-time. You can provide additional instructions or approve changes remotely. Use
vibe remote statusto check on all active agents. The agent operates independently, so you don't need to approve every step—only major ones you configure.Step 7: Review and Finalize with Pull Requests
Once the agent completes a task, it can automatically open a pull request on GitHub (if configured). You'll receive a notification via Slack, Teams, or email. Review the PR—the agent includes a summary of changes, test results, and links to the diffs. You can make manual edits or merge directly. The agent never committed to your main branch; it always creates a PR for human oversight.
Tips for Success
- Use Mistral Medium 3.5 for best performance—it's the default model in Vibe and Le Chat and scored 77.6% on SWE-Bench, meaning it excels at real-world software engineering tasks.
- Leverage parallel agents: Since each session runs in isolation, you can run multiple agents simultaneously on different codebase areas (e.g., one refactoring, another writing tests).
- Integrate with issue trackers: Connect Linear or Jira so the agent can pick tasks from your backlog automatically. Use
vibe remote start --issue "PROJ-123". - Monitor resource usage: Cloud agents consume compute credits. Check your Mistral dashboard to avoid surprises.
- Start simple: For your first remote agent, give it a small, well-defined task like “Add error handling to the API client.” Gradually scale to larger refactors.
- Security note: The agent only accesses repositories you authorize. Review permissions in your GitHub settings.